Transferring files
Warning
As with all connections to the cluster(s), if you are not using a wired ethernet connection in a University campus building then you will need to turn on the VPN.
To transfer files to/from a cluster you can:
Use a program that supports one or both of the SCP and SFTP protocols to copy/move files to/from your own machine or from a remote machine to a cluster.
Use a Research Storage fileshare as common storage directly accessible from your own machine and from a cluster.
Use a program like
curlorwgetto download files directly to a cluster.Use a flight session on Stanage to open a Firefox browser and interactively download directly to a cluster.
Hint
Downloading directly to the cluster may be 10x to 100x faster than doing a transfer from your local desktop or laptop (particularly if connecting remotely via VPN) as this will avoid using your local device’s internet connection which is likely a bottleneck. If you are able, you should make direct downloads to a cluster.
Transfers with SCP/SFTP
Secure copy protocol (SCP) is a protocol for securely transferring computer files between a local host and a remote host or between two remote hosts. It is based on the Secure Shell (SSH) protocol and the acronym typically refers to both the protocol and the command itself.
Secure File Transfer Protocol (SFTP) is also a file transfer protocol. It is based on the FTP protocol with included SSH security components.
Hint
If you need to move large files (e.g. larger than a gigabyte) from one remote machine to a cluster you should SSH in to the computer hosting the files and use scp or rsync to transfer over to the other directly as this will usually be quicker and more reliable.
If you cannot SSH into the remote machine, consider an alternative direct transfer method listed below.
Using SCP in the terminal
If your local machine has a terminal and the scp (“secure copy”) command is available
you can use it to make transfers of files or folders.
Where below substitute CLUSTER_NAME with stanage and YOUR_USERNAME with your cluster username, and should always be entered in lowercase.
You should be prompted for your Duo MFA credentials after entering your password. Request a push notification or enter your passcode.
To upload, you transfer from your local machine to the remote cluster:
scp /path/to/file.txt YOUR_USERNAME@CLUSTER_NAME.shef.ac.uk:/path/to/directory/
To download, you transfer from the remote cluster to your local machine:
scp YOUR_USERNAME@CLUSTER_NAME.shef.ac.uk:/path/to/file.txt /path/to/directory/
To copy a whole directory, we add the -r flag, for “recursive”
scp -r YOUR_USERNAME@CLUSTER_NAME.shef.ac.uk:/path/to/my_results /path/to/directory/
Using FileZilla
FileZilla is a cross-platform client available for Windows, MacOS and Linux for downloading and uploading files to and from a remote computer.
Download and install the FileZilla client from https://filezilla-project.org. After installing and opening the program, there is a window with a file browser of your local system on the left hand side of the screen and when you connected to a cluster, your cluster files will appear on the right hand side.
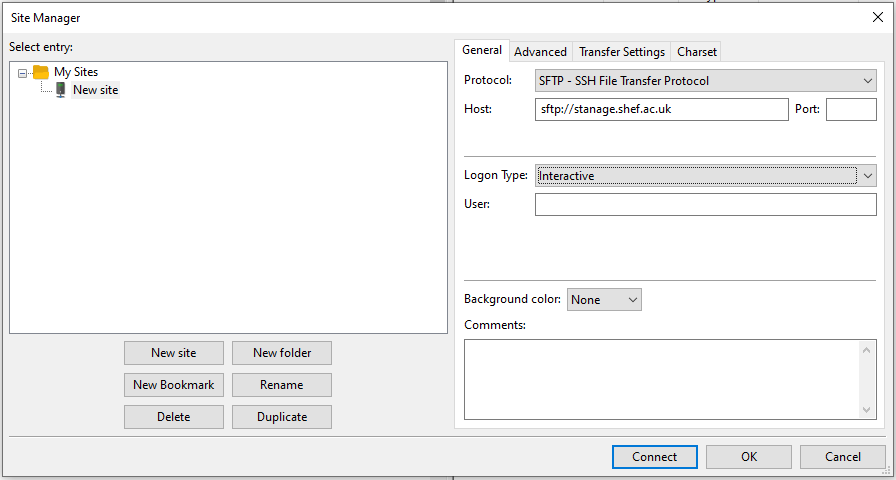
To connect to the cluster, we’ll just need make a new site and enter our credentials in the General tab:
Caution
By default FileZilla will save profiles in plaintext on your machine. You must ensure you use a master password to encrypt these credentials by changing the settings as shown in these instructions.
You can create a new site by selecting file from top menu bar then site manager which will open a dialog similar to:

After hitting the new site button you can enter your credentials in the general tab:
Host: sftp://CLUSTER_NAME.shef.ac.uk (replace CLUSTER_NAME with stanage)
User: Your cluster username, which should always be entered in lowercase.
Password: Your cluster password (leave blank and fill this interactively if on a shared machine.)
Port: (leave blank to use the default port)
Protocol: sftp
Logon Type: Interactive
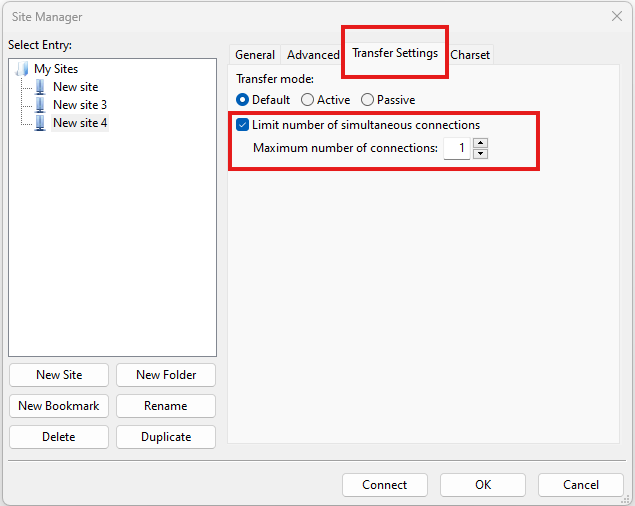
In the transfer settings tab limit the number of simultaneous connections to 1.

Save these details as a profile and then connect. You should be prompted for your Duo MFA credentials. Request a push notification or enter your passcode. You will now see your remote files appear on the right hand side of the screen. This process can be repeated to save a profile for each cluster.
You can drag-and-drop files between the left (local) and right (remote) sides of the screen to transfer files.
Using rsync
As you become more familiar with transferring files, you may find that the scp is limited. The rsync utility provides
advanced features for file transfer and is typically faster compared to both scp and sftp. It is a utility for
efficiently transferring and synchronizing files between storage locations including networked computers by comparing the
modification times and sizes of files. The utility is particularly useful as it can also resume failed or partial file
transfers by using the --append-verify flag.
Many users find rsync is especially useful for transferring large and/or many files as well as creating synced
backup folders.
Caution
It is easy to make mistakes with rsync and accidentally transfer files to the wrong location, sync in the wrong
direction or otherwise accidentally overwrite files. To help you avoid this, you can first use the --dry-run flag for
rsync to show you the changes it will make for a given command.
Note
Be cautious when specifying paths with or without trailing slashes.
Ensure that you understand how rsync interprets these slashes to prevent unintended outcomes.
rsync Behaviour with Trailing Slashes
With Trailing Slash on Source Directory:
rsync -av /source/directory/ /destination/directory
When you use a trailing slash on the source directory it tells
rsyncto copy the contents of the source directory into the destination directory.
Without Trailing Slash on Source Directory:
rsync -av /source/directory /destination/directory
When you don’t use a trailing slash on the source directory it tells
rsyncto copy the source directory itself and its contents into the destination directory.
Trailing Slash on Destination Directory:
rsync -av /source/directory/ /destination/directory/
When you use a trailing slash on the destination directory it tells
rsyncto copy the source directory itself and its contents into the destination directory.
Without Trailing Slash on Destination Directory:
rsync -av /source/directory/ /destination/directory
When you don’t use a trailing slash on the destination directory it tells
rsyncto copy the contents of the source directory into the destination directory.
The rsync syntax is very similar to scp. To transfer to another computer with commonly used options,
where below substitute CLUSTER_NAME with stanage and YOUR_USERNAME with your cluster username, which should always be entered in lowercase.
You should be prompted for your Duo MFA credentials after entering your password. Request a push notification or
enter your passcode:
rsync -avzP /path/to/file.iso YOUR_USERNAME@CLUSTER_NAME.shef.ac.uk:/path/to/directory/
The a (archive) option preserves file timestamps and permissions among other things;
the v (verbose) option gives verbose output to help monitor the transfer;
the z (compression) option compresses the file during transit to reduce size and transfer time;
and the P (partial/progress) option preserves partially transferred files in case of an interruption
and also displays the progress of the transfer.
To recursively copy a directory, we can use the same options:
rsync -avzP /path/to/isos/ YOUR_USERNAME@CLUSTER_NAME.shef.ac.uk:/path/to/directory/
This will copy the local directory and its contents under the specified directory on the remote system. If the trailing slash is omitted on the destination path, a new directory corresponding to the transferred directory (isos in the example) will not be created, and the contents of the source directory will be copied directly into the destination directory.
As before with scp, to download from the cluster rather than upload simply reverse the source and destination:
rsync -avzP YOUR_USERNAME@CLUSTER_NAME.shef.ac.uk:/path/to/isos /path/to/directory/
How to download files directly to the cluster
Downloading files directly to a cluster is usually the quickest and most efficient way of getting files onto the cluster(s). Using your home connection will be a significant speed bottleneck compared to large amounts of download bandwidth available on the cluster(s). Directly downloading to a cluster avoids this bottleneck!
Using the Firefox Browser
The Firefox browser can be used on Stanage to interactively navigate the web, login to websites and download files as you would do locally.
Graphical desktop access to an interactive session can be achieved using
Flight Desktop and TigerVNC .
Once you have loaded the GUI desktop, open a terminal at the bottom of the screen
and enter the command firefox, which will launch a browser.
Using wget / curl
One of the most efficient ways to download files to a cluster is to use either the curl or wget commands to download directly.
The syntax for these commands is as below:
Downloading with wget
wget https://software.github.io/program/files/myprogram.tar.gz
Downloading with curl
curl -O https://software.github.io/program/files/myprogram.tar.gz
Using Git
The Git software and same named command can be used to download or synchronise a remote Git repository onto the cluster(s). This can be achieved by setting up Git and/or simply cloning the repository you desire.
For example, cloning the source of the make software:
[user@login1 make-git]$ git clone https://git.savannah.gnu.org/git/make.git
Cloning into 'make'...
remote: Counting objects: 16331, done.
remote: Compressing objects: 100% (3434/3434), done.
remote: Total 16331 (delta 12822), reused 16331 (delta 12822)
Receiving objects: 100% (16331/16331), 5.07 MiB | 2.79 MiB/s, done.
Resolving deltas: 100% (12822/12822), done.
Git is installed on the clusters and can be used on any node and all commands such as push, pull etc… are supported.
Using lftp
Hint
It is recommended that you use an alternative method than lftp if possible. Using
lftp in the command line interface should be a last resort as it is a little
difficult / confusing to use.
lftp is a command-line program client for FTP, FTPS, FXP, HTTP, HTTPS, FISH, SFTP,
BitTorrent, and FTP over HTTP proxy.
If you need to login to an FTP server to
make a direct download to a cluster, you can use the lftp client.
Connecting with lftp
Caution
Where possible please connect with the ftps protocol as this protects your username and password from hackers performing man in the middle or sniffing attacks!
Connecting to an FTP server can be achieved as follows:
lftp ftps://ftp.remotehost.com
When this connection is successful an lftp prompt will appear as follows:
lftp ftp.remotehost.com:~>
At this stage you can now login after being prompted for your password as follows:
lftp ftp.remotehost.com:~> login username
Password:
At this stage directory listing and changing directory can be achieved using the
ls and cd commands. By default these commands run on the remote server. To run
these commands on the local machine simply prefix each command with an ! i.e.
!ls and !cd.
The get (download) and put (upload) commands can also be used.
Downloading with lftp
To download a file use the get command as follows:
lftp username@ftp.remotehost.com/> get myfile.txt -o mydownloadedfile.txt
Uploading with lftp
To upload a file use the put command as follows:
lftp username@ftp.remotehost.com/> put myfile.txt -o myuploadedfile.txt